

I have a tutorial to share today! I'm usually too impatient to shoot photos as I work. But I was hunkered down in the craft room during Hurricane Nemo this weekend, and I used the time to capture the process of making this fun project.
We're going to start a family sometime soon through adoption, and I've been having a wonderful time picking things up for our nursery as we wait for the baby to come.
I recently bought an adorable little kid's dresser at the Habitat for Humanity ReStore in Newburgh, NY that I'm going to refinish and repurpose into a changing table for the nursery. Then I got a great deal on a changing table pad at one of my FAVORITE shops here in Beacon: Trendy Tots Take Two, a consignment boutique with amazing items for babies and kids. Here's the changing table pad:

I was thinking about buying a cover for it, and then I decided to check my fabric stash to see if I could throw something together with materials I had on hand. And sure enough, the craft stash came through for me with a simple men's cotton t-shirt!
A while back, I picked up this t-shirt at a thrift store for a couple of dollars. I had big plans to cut it up into "t-shirt yarn" and knit with it.

Since our nursery is decorated in sage green and yellow, I decided that this bad boy would be put to much better use as a changing pad cover for our little bambino-to-be. First thing I did was cut off the sleeves, and chop off the neckband.

Next I needed to to make the fabric into a large rectangle that would fit around the pad. I trimmed the sides under the arms until they were a straight line, and then I pinned the right sides together...

...and sewed them up:

Now I've got a single piece of fabric that's big enough to cover the pad!

I laid the fabric out on my work table so I could trace the pad for size.

And I traced around the edge with a quilter's pencil.

I estimated that I would need about 4 1/2 inches to cover the sides and create an elasticized hem, so I drew another line that far out from my original oval, and lopped off the extra fabric.

Next, I ironed the entire edge under 1/2 inch:

Then I folded it over again, this time 3/4 of an inch. I wanted to make sure I had plenty of room to thread my elastic through after I stitched the hem.

I pinned the whole thing:

Then I stitched all the way around, except for a small opening that I would use for threading the elastic. I felt like the cover was looking a little boring at this point, so I decided to applique some hearts to it. I used one of my little heart patterns to cut out three heart shapes...

...and I pinned them down, and zig-zag stitched them in place.

Next, it was time to add the elastic. I pulled out my Easy Threader...

...and threaded the elastic through:
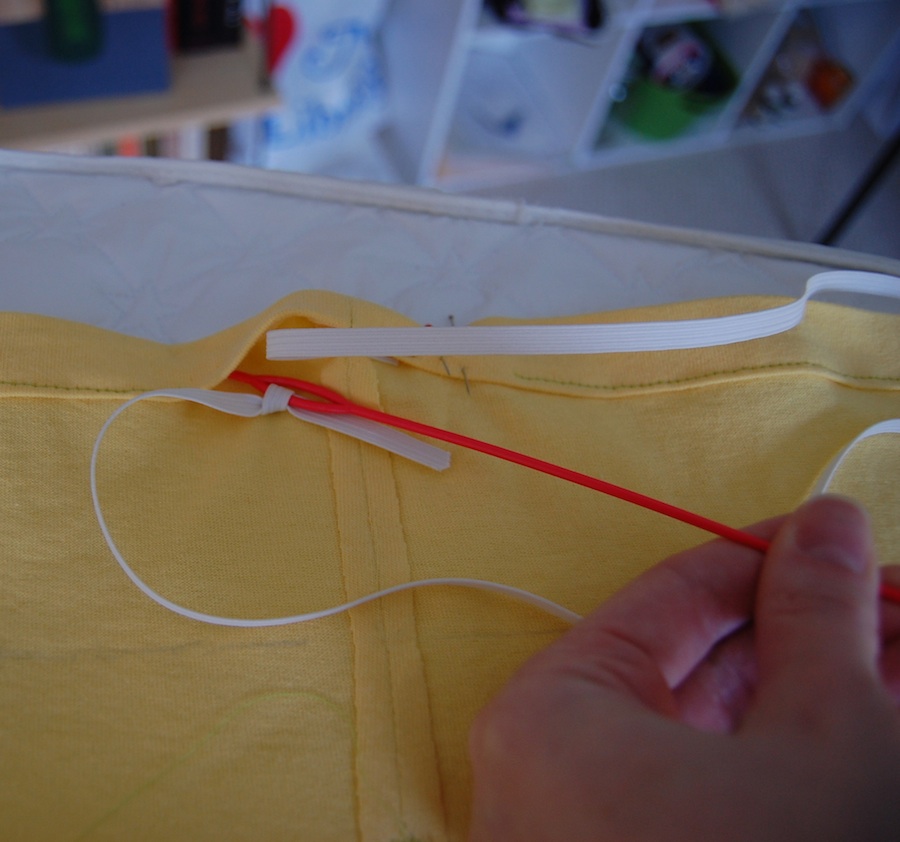
(Astute readers may notice that I have the threader backwards in this photo. I figured it out and threaded it the right way but forgot to re-shoot this step!)
Once the elastic was all the way through, I stitched it in place and closed up the hem.
I'm so thrilled with how easy this cover was to make, and how cute it turned out!

The changing table is in the basement, awaiting her make-over. Since I can't shoot the pad on the table just yet, I figured a shot inside our crib, with little Mr. Crinkle, Tinkle, Rattle, and Squeak would do just fine for now.
I think my next nursery project will be some blackout curtains to help the little one (and us!) get some shut-eye. If you have any fun nursery craft projects to share, drop me a line! I'm in full-on nesting mode over here.
Never mind your awesome crafting skills. You're gonna have a baby?!? Congratulations!!! Do you know what it's gonna be and when he or she will come to live with you? Sorry if I'm being too nosy! x
ReplyDeleteThanks for your good wishes, Annika! Yes, we're going to have a baby. The baby's gender, and when s/he arrives, will both be a surprise. :) I'm just going to keep crafting away to get ready until that day comes.
DeleteThis cover looks great! I want some shots of that adorable crib sheet, too, please. Are those giraffes??
ReplyDeleteYou bet your sweet bippy those are giraffes! And elephants, ducks and frogs! It's a Carters Easy Fit Printed Crib Fitted Sheet in "Safari Duck." I love it. :)
DeleteGreat recycling!!! And glad to hear you're at this stage... we really need to catch up!!
ReplyDeleteThanks, Jen! I was happy to make a small dent in my stash of craft supplies with this project. I have been reading an awesome blog recently that has really helped me give old items a new life with a little creative stitching: it's called New Dress a Day and you can find it here: http://www.newdressaday.com/
DeleteThis girl can take ANYTHING from the thrift store and make it cute and fashion forward. :)
And yes, we do need to catch up!